StyleTransferCam - Cámara de transferencia de estilo basada en ESP32-S3
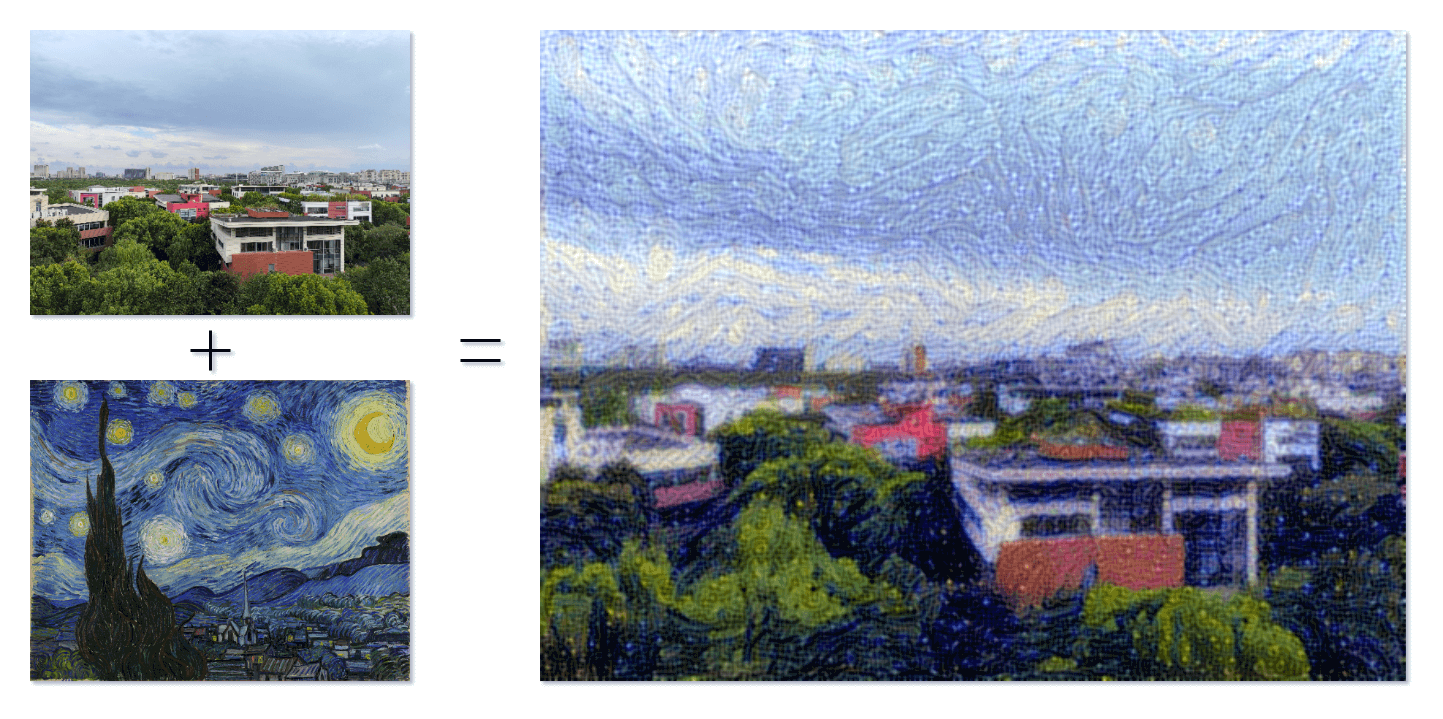
Cuando el arte y la tecnología se encuentran, un nuevo mundo se despliega ante nosotros. Es un festín visual maravilloso y una exploración llena de posibilidades infinitas. StyleTransferCam es una cámara de transferencia de estilo basada en ESP32-S3. Utiliza una técnica de aprendizaje automático llamada "transferencia de estilo". Cuando presionas el botón integrado, captura la escena actual y la combina con una foto de estilo predefinido (como "Starry Night" de Van Gogh) para crear una obra única y original.
StyleTransferCam consta de los siguientes pasos principales:
- Presionar el botón integrado: captura una foto y la carga en un servidor backend (puede ser una PC o un teléfono antiguo).
- Iniciar automáticamente un programa Python de transferencia de estilo para procesar la foto y generar una versión estilizada.
- Si ESP32-S3 tiene una pantalla TFT incorporada, también puede mostrar la foto estilizada en la pantalla.
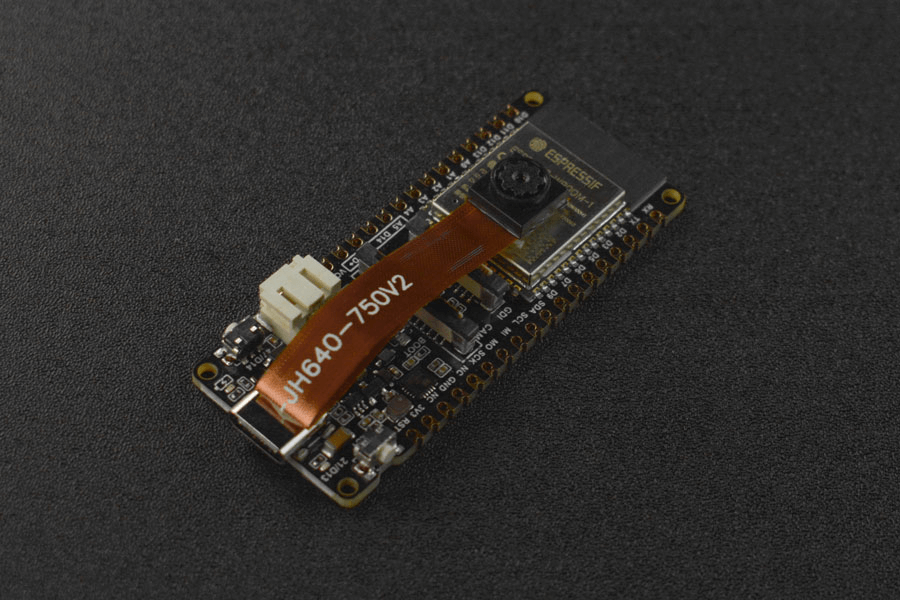
Probar el botón integrado y el LED
Primero, se proporciona un programa simple de Arduino para probar si el botón integrado y el LED funcionan correctamente. El programa configura una interrupción de hardware para capturar el evento de presionar el botón y enciende el LED durante medio segundo antes de apagarse automáticamente.
#define ONBOARD_KEY 47  // Botón integrado
#define ONBOARD_LED 21  // LED integrado

volatile bool buttonPressed = false;  // Bandera de interrupción de flanco descendente del botón

void setup() {
  pinMode(ONBOARD_LED, OUTPUT);
  pinMode(ONBOARD_KEY, INPUT);
  Serial.begin(115200);
  attachInterrupt(digitalPinToInterrupt(ONBOARD_KEY), buttonInterrupt, FALLING);
}

void loop() {
  if (buttonPressed) {
    digitalWrite(ONBOARD_LED, HIGH);
    delay(500);
    digitalWrite(ONBOARD_LED, LOW);
    Serial.println("buttonPressed");
    buttonPressed = false;  // Restablecer la bandera de interrupción
  }
}

void buttonInterrupt() {
  buttonPressed = true;  // Establecer la bandera de interrupción de flanco descendente
}
Capturar y cargar una foto usando el botón
A continuación, escribimos un programa de Arduino que utiliza el botón integrado para controlar la captura de una foto con ESP32-S3 y cargarla en una ubicación de red específica. La ubicación de red se establece en el código como serverName = "http://192.168.31.2:9000/upload" y debe modificarse con la dirección de tu servidor backend. Utilizamos un servicio de carga de archivos Python en el backend (se explicará en los pasos siguientes), por lo que aquí debes cambiarlo por la dirección IP de la máquina que ejecuta este servicio (9000 y /upload se configuran en el programa receive-photo.py que se menciona a continuación).
#include "esp_camera.h"
#include <WiFi.h>
#include <HTTPClient.h>

// Dirección del servidor para cargar la foto
const char *serverName = "http://192.168.31.2:9000/upload";


//
// ¡ADVERTENCIA! Se requiere un IC PSRAM para la resolución UXGA y alta calidad JPEG
// Asegúrese de seleccionar el módulo ESP32 Wrover o una placa con PSRAM
// Se transmitirán imágenes parciales si la imagen excede el tamaño del búfer
//
// Debe seleccionar un esquema de partición desde el menú de la placa que tenga al menos 3MB de espacio APP.
// El reconocimiento facial está DESACTIVADO para ESP32 y ESP32-S2, porque tarda aproximadamente 15 segundos en procesar un solo fotograma. La detección facial está ACTIVADA si PSRAM también está habilitado.

// ===================
// Seleccione el modelo de cámara
// ===================
#define PWDN_GPIO_NUM -1
#define RESET_GPIO_NUM -1
#define XCLK_GPIO_NUM 45
#define SIOD_GPIO_NUM 1
#define SIOC_GPIO_NUM 2

#define Y9_GPIO_NUM 48
#define Y8_GPIO_NUM 46
#define Y7_GPIO_NUM 8
#define Y6_GPIO_NUM 7
#define Y5_GPIO_NUM 4
#define Y4_GPIO_NUM 41
#define Y3_GPIO_NUM 40
#define Y2_GPIO_NUM 39
#define VSYNC_GPIO_NUM 6
#define HREF_GPIO_NUM 42
#define PCLK_GPIO_NUM 5

#define ONBOARD_KEY 47 // Botón en la placa
#define ONBOARD_LED 21 // LED en la placa

volatile bool buttonPressed = false; // Bandera de interrupción de flanco descendente del botón

#include "DFRobot_AXP313A.h"

DFRobot_AXP313A axp;

// ===========================
// Ingrese las credenciales de su WiFi
// ===========================
const char *ssid = "WiFi_SSID";
const char *password = "********";

void startCameraServer();

void setup()
{
  pinMode(ONBOARD_KEY, INPUT);
  pinMode(ONBOARD_LED, OUTPUT);
  attachInterrupt(digitalPinToInterrupt(ONBOARD_KEY), buttonInterrupt, FALLING);
  Serial.begin(115200);
  Serial.setDebugOutput(true);
  Serial.println();
  while (axp.begin() != 0)
  {
    Serial.println("error de inicialización");
    delay(1000);
  }
  axp.enableCameraPower(axp.eOV2640); // Configurar alimentación de la cámara
  camera_config_t config;
  config.ledc_channel = LEDC_CHANNEL_0;
  config.ledc_timer = LEDC_TIMER_0;
  config.pin_d0 = Y2_GPIO_NUM;
  config.pin_d1 = Y3_GPIO_NUM;
  config.pin_d2 = Y4_GPIO_NUM;
  config.pin_d3 = Y5_GPIO_NUM;
  config.pin_d4 = Y6_GPIO_NUM;
  config.pin_d5 = Y7_GPIO_NUM;
  config.pin_d6 = Y8_GPIO_NUM;
  config.pin_d7 = Y9_GPIO_NUM;
  config.pin_xclk = XCLK_GPIO_NUM;
  config.pin_pclk = PCLK_GPIO_NUM;
  config.pin_vsync = VSYNC_GPIO_NUM;
  config.pin_href = HREF_GPIO_NUM;
  config.pin_sscb_sda = SIOD_GPIO_NUM;
  config.pin_sscb_scl = SIOC_GPIO_NUM;
  config.pin_pwdn = PWDN_GPIO_NUM;
  config.pin_reset = RESET_GPIO_NUM;
  config.xclk_freq_hz = 20000000;
  config.frame_size = FRAMESIZE_UXGA;   // Resolución de la foto. Aquí se establece en FRAMESIZE_UXGA por defecto
  config.pixel_format = PIXFORMAT_JPEG; // para transmisión
  // config.pixel_format = PIXFORMAT_RGB565; // para detección/reconocimiento facial
  config.grab_mode = CAMERA_GRAB_WHEN_EMPTY;
  config.fb_location = CAMERA_FB_IN_PSRAM;
  config.jpeg_quality = 0; // 63; // Calidad de la foto. Aquí se establece en 12 por defecto
  config.fb_count = 1;

  /*
  FRAMESIZE_QVGA (320 x 240)
  FRAMESIZE_CIF (352 x 288)
  FRAMESIZE_VGA (640 x 480)
  FRAMESIZE_SVGA (800 x 600)
  FRAMESIZE_XGA (1024 x 768)
  FRAMESIZE_SXGA (1280 x 1024)
  FRAMESIZE_UXGA (1600 x 1200)
  */
}

```cpp
// si el IC PSRAM está presente, inicializar con resolución UXGA y mayor calidad JPEG
// para un búfer de cuadro preasignado más grande.
if (config.pixel_format == PIXFORMAT_JPEG)
{
  if (psramFound())
  {
    config.jpeg_quality = 0; // 63; // Calidad de la foto. Aquí se establece en 10 por defecto
    config.fb_count = 2;
    config.grab_mode = CAMERA_GRAB_LATEST;
  }
  else
  {
    // Limitar el tamaño del cuadro cuando no hay PSRAM disponible
    config.frame_size = FRAMESIZE_UXGA; // Resolución de la foto. Aquí se establece en FRAMESIZE_SVGA por defecto
    config.fb_location = CAMERA_FB_IN_DRAM;
  }
}
else
{
  // Mejor opción para detección/reconocimiento facial
  config.frame_size = FRAMESIZE_UXGA; // FRAMESIZE_240X240;
#if CONFIG_IDF_TARGET_ESP32S3
  config.fb_count = 2;
#endif
}

#if defined(CAMERA_MODEL_ESP_EYE)
  pinMode(13, INPUT_PULLUP);
  pinMode(14, INPUT_PULLUP);
#endif

// inicialización de la cámara
esp_err_t err = esp_camera_init(&config);
if (err != ESP_OK)
{
  Serial.printf("La inicialización de la cámara falló con el error 0x%x", err);
  return;
}

sensor_t *s = esp_camera_sensor_get();
// los sensores iniciales están volteados verticalmente y los colores están un poco saturados
if (s->id.PID == OV3660_PID)
{
  s->set_vflip(s, 1);       // voltearla de nuevo
  s->set_brightness(s, 1);  // aumentar el brillo un poco
  s->set_saturation(s, -2); // reducir la saturación
}
// reducir el tamaño del cuadro para una mayor velocidad de cuadro inicial
if (config.pixel_format == PIXFORMAT_JPEG)
{
  s->set_framesize(s, FRAMESIZE_QVGA);
}

#if defined(CAMERA_MODEL_M5STACK_WIDE) || defined(CAMERA_MODEL_M5STACK_ESP32CAM)
  s->set_vflip(s, 1);
  s->set_hmirror(s, 1);
#endif

#if defined(CAMERA_MODEL_ESP32S3_EYE)
  s->set_vflip(s, 1);
#endif

WiFi.begin(ssid, password);
WiFi.setSleep(false);
while (WiFi.status() != WL_CONNECTED)
{
  delay(500);
  Serial.print(".");
}
Serial.println("");
Serial.println("WiFi connected");

startCameraServer();

Serial.print("Camera Ready! Use 'http://");
Serial.print(WiFi.localIP());
Serial.println("' to connect");
digitalWrite(ONBOARD_LED, LOW);
}

void loop()
{
  // Do nothing. Everything is done in another task by the web server
  // delay(10000);

  // Logic after button press
  if (buttonPressed)
  {
    digitalWrite(ONBOARD_LED, HIGH);
    delay(300);
    digitalWrite(ONBOARD_LED, LOW);

    // Take a photo
    camera_fb_t *fb = esp_camera_fb_get();
    if (!fb)
    {
      Serial.println("Failed to get camera frame buffer");
      return;
    }

    // Create HTTP client
    HTTPClient http;

    // Upload the photo to the server
    http.begin(serverName);
    http.addHeader("Content-Type", "image/jpeg");
    int httpResponseCode = http.POST(fb->buf, fb->len);
    if (httpResponseCode > 0)
    {
      Serial.printf("Photo uploaded successfully, server response code: %d\n", httpResponseCode);

      // Blink again to indicate successful upload
      digitalWrite(ONBOARD_LED, HIGH);
      delay(300);
      digitalWrite(ONBOARD_LED, LOW);
    }
    else
    {
      Serial.printf("Failed to upload photo, error code: %s\n", http.errorToString(httpResponseCode).c_str());
    }
    http.end();

    // Release frame buffer
    esp_camera_fb_return(fb);

    // delay(1000); // Wait for 1 second before taking another photo and uploading

    buttonPressed = false; // Reset interrupt flag
  }
}

void buttonInterrupt()
{
  buttonPressed = true; // Set falling edge interrupt flag
}
Server to receive photo uploads
Here we use the Flask library in Python to build an HTTP server that can receive photo uploads.
from flask import Flask, request
import subprocess

app = Flask(__name__)

@app.route('/upload', methods=['POST'])
def upload():
    try:
        image = request.data
from IPython.display import Image, display
import numpy as np
import tensorflow as tf
from tensorflow import keras
from tensorflow.keras.applications import vgg19

base_image_path = "./base.png"  # Address of the image to be style transferred
style_reference_image_path = "./style_reference.png"  # Address of the style reference image

result_prefix = "img_generated"

# Weight settings for each loss component
total_variation_weight = 1e-6
style_weight = 1e-6
content_weight = 2.5e-8

# Dimensions of the generated image
width, height = keras.preprocessing.image.load_img(base_image_path).size
img_nrows = 400
img_ncols = int(width * img_nrows / height)

# Display the base image and style reference image
display(Image(base_image_path))
display(Image(style_reference_image_path))

# Image preprocessing
def preprocess_image(image_path):
    # Utiliza la función de la biblioteca Keras para abrir la imagen, ajustar su tamaño y formatearla como un tensor adecuado
    img = keras.preprocessing.image.load_img(
        image_path, target_size=(img_nrows, img_ncols)
    )
    img = keras.preprocessing.image.img_to_array(img)
    img = np.expand_dims(img, axis=0)
    img = vgg19.preprocess_input(img)
    return tf.convert_to_tensor(img)


def deprocess_image(x):
    # Utiliza la función para convertir el tensor en una imagen válida
    x = x.reshape((img_nrows, img_ncols, 3))
    # Elimina el centro cero mediante la media de los píxeles
    x[:, :, 0] += 103.939
    x[:, :, 1] += 116.779
    x[:, :, 2] += 123.68
    # 'BGR'->'RGB'
    x = x[:, :, ::-1]
    x = np.clip(x, 0, 255).astype("uint8")
    return x


# La matriz de gram de un tensor de imagen (producto de la matriz de características y su traspuesta)

def gram_matrix(x):
    x = tf.transpose(x, (2, 0, 1))
    features = tf.reshape(x, (tf.shape(x)[0], -1))
    gram = tf.matmul(features, tf.transpose(features))
    return gram

# La "pérdida de estilo" tiene como objetivo preservar el estilo de la imagen de referencia en la imagen generada.
# Se basa en la matriz de gram (extracción de estilo) de la imagen de referencia de estilo
# y las características de la imagen generada a partir de ella.


def style_loss(style, combination):
    S = gram_matrix(style)
    C = gram_matrix(combination)
    channels = 3
    size = img_nrows * img_ncols
    return tf.reduce_sum(tf.square(S - C)) / (4.0 * (channels ** 2) * (size ** 2))

# La función de pérdida de contenido está diseñada para mantener el contenido de la imagen base en la imagen generada.

def content_loss(base, combination):
    return tf.reduce_sum(tf.square(combination - base))

# La tercera función de pérdida es la pérdida total de variación,
# diseñada para mantener la coherencia local en la imagen generada.

def total_variation_loss(x):
    a = tf.square(
        x[:, : img_nrows - 1, : img_ncols - 1, :] - x[:, 1:, : img_ncols - 1, :]
    )
    b = tf.square(
        x[:, : img_nrows - 1, : img_ncols - 1, :] - x[:, : img_nrows - 1, 1:, :]
    )
    return tf.reduce_sum(tf.pow(a + b, 1.25))

# A continuación, creemos un modelo de extracción de características que recupere las activaciones intermedias de VGG19 (según el nombre del diccionario).

# Reemplaza con la ruta de archivo de pesos descargados en tu local
weights_path = "./dependencies/vgg19_weights_tf_dim_ordering_tf_kernels_notop.h5"
# Crea un modelo VGG19 que carga los pesos pre-entrenados de ImageNet
model = vgg19.VGG19(weights=weights_path, include_top=False)

# Obtiene las salidas simbólicas de cada capa "clave" (a las que se les ha asignado un nombre único).
outputs_dict = dict([(layer.name, layer.output) for layer in model.layers])

# Crea un modelo que devuelve los valores de activación de cada capa en VGG19 (en forma de diccionario).
feature_extractor = keras.Model(inputs=model.inputs, outputs=outputs_dict)

# Por último, aquí está el código para calcular la pérdida de transferencia de estilo.

# Lista de capas utilizadas para la pérdida de estilo.
style_layer_names = [
    "block1_conv1",
    "block2_conv1",
    "block3_conv1",
    "block4_conv1",
    "block5_conv1",
]
# Capa utilizada para la pérdida de contenido.
content_layer_name = "block5_conv2"


def compute_loss(combination_image, base_image, style_reference_image):
    input_tensor = tf.concat(
        [base_image, style_reference_image, combination_image], axis=0
    )
    features = feature_extractor(input_tensor)

    # Inicializa la pérdida
    loss = tf.zeros(shape=())

    # Agrega la pérdida de contenido
    layer_features = features[content_layer_name]
    base_image_features = layer_features[0, :, :, :]
    combination_features = layer_features[2, :, :, :]
    loss = loss + content_weight * content_loss(
        base_image_features, combination_features
    )
    # Agrega la pérdida de estilo
    for layer_name in style_layer_names:
        layer_features = features[layer_name]
        style_reference_features = layer_features[1, :, :, :]
        combination_features = layer_features[2, :, :, :]
        sl = style_loss(style_reference_features, combination_features)
        loss += (style_weight / len(style_layer_names)) * sl

    # Agrega la pérdida total de variación
    loss += total_variation_weight * total_variation_loss(combination_image)
    return loss


# Agrega el decorador tf.function a los cálculos de pérdida y gradiente para que se ejecuten más rápido durante la compilación
@tf.function
def compute_loss_and_grads(combination_image, base_image, style_reference_image):
    with tf.GradientTape() as tape:
        loss = compute_loss(combination_image, base_image,
                            style_reference_image)
    grads = tape.gradient(loss, combination_image)
    return loss, grads

# Repeat the batch gradient descent steps to minimize the loss as much as possible, and save the generated image every 100 iterations.
# Reduce the learning rate by 0.96 every 100 steps.

optimizer = keras.optimizers.SGD(
    keras.optimizers.schedules.ExponentialDecay(
        initial_learning_rate=100.0, decay_steps=100, decay_rate=0.96
    )
)

base_image = preprocess_image(base_image_path)
style_reference_image = preprocess_image(style_reference_image_path)
combination_image = tf.Variable(preprocess_image(base_image_path))

iterations = 4000
for i in range(1, iterations + 1):
    loss, grads = compute_loss_and_grads(
        combination_image, base_image, style_reference_image
    )
    optimizer.apply_gradients([(grads, combination_image)])
    if i % 100 == 0:
        print("Iteration %d: loss=%.2f" % (i, loss))
        img = deprocess_image(combination_image.numpy())
        fname = result_prefix + "_at_iteration_%d.png" % i
        keras.preprocessing.image.save_img(fname, img)

# After 4000 iterations, the output result is:
display(Image(result_prefix + "_at_iteration_4000.png"))
Now, you can try running this Python program separately. If the program does not report any errors, wait a moment (the specific time depends on the performance of your computer), and you will find the stylized photo after the iterative style transfer in the current directory.
If this program runs successfully, you can directly run receive-photo.py to receive photos taken by ESP32-S3 and generate stylized photos in an automated way.
References and Acknowledgements
Dirección original del artículo: https://wiki-power.com/
Este artículo está protegido por la licencia CC BY-NC-SA 4.0. Si desea reproducirlo, por favor indique la fuente.Este post está traducido usando ChatGPT, por favor feedback si hay alguna omisión.