Notas de Estudio de Git
Instalación y Configuración
Descargar el paquete de instalación: git-scm.com/downloads
Configuración:
Comandos Básicos
Flujo Básico
- Cambiar al directorio deseado:
cd git-learning - Inicializar el repositorio Git:
git init - Mover los archivos existentes o nuevos del área de trabajo al área de preparación:
git add .: Agregar todos los archivos del área de trabajogit add xxx.xx: Agregar un archivo individual
- Confirmar las actualizaciones en el área de preparación:
git commit -m "descripción" - Cambiar a una versión específica:
git reset --hard id_de_commit
Comandos Comunes
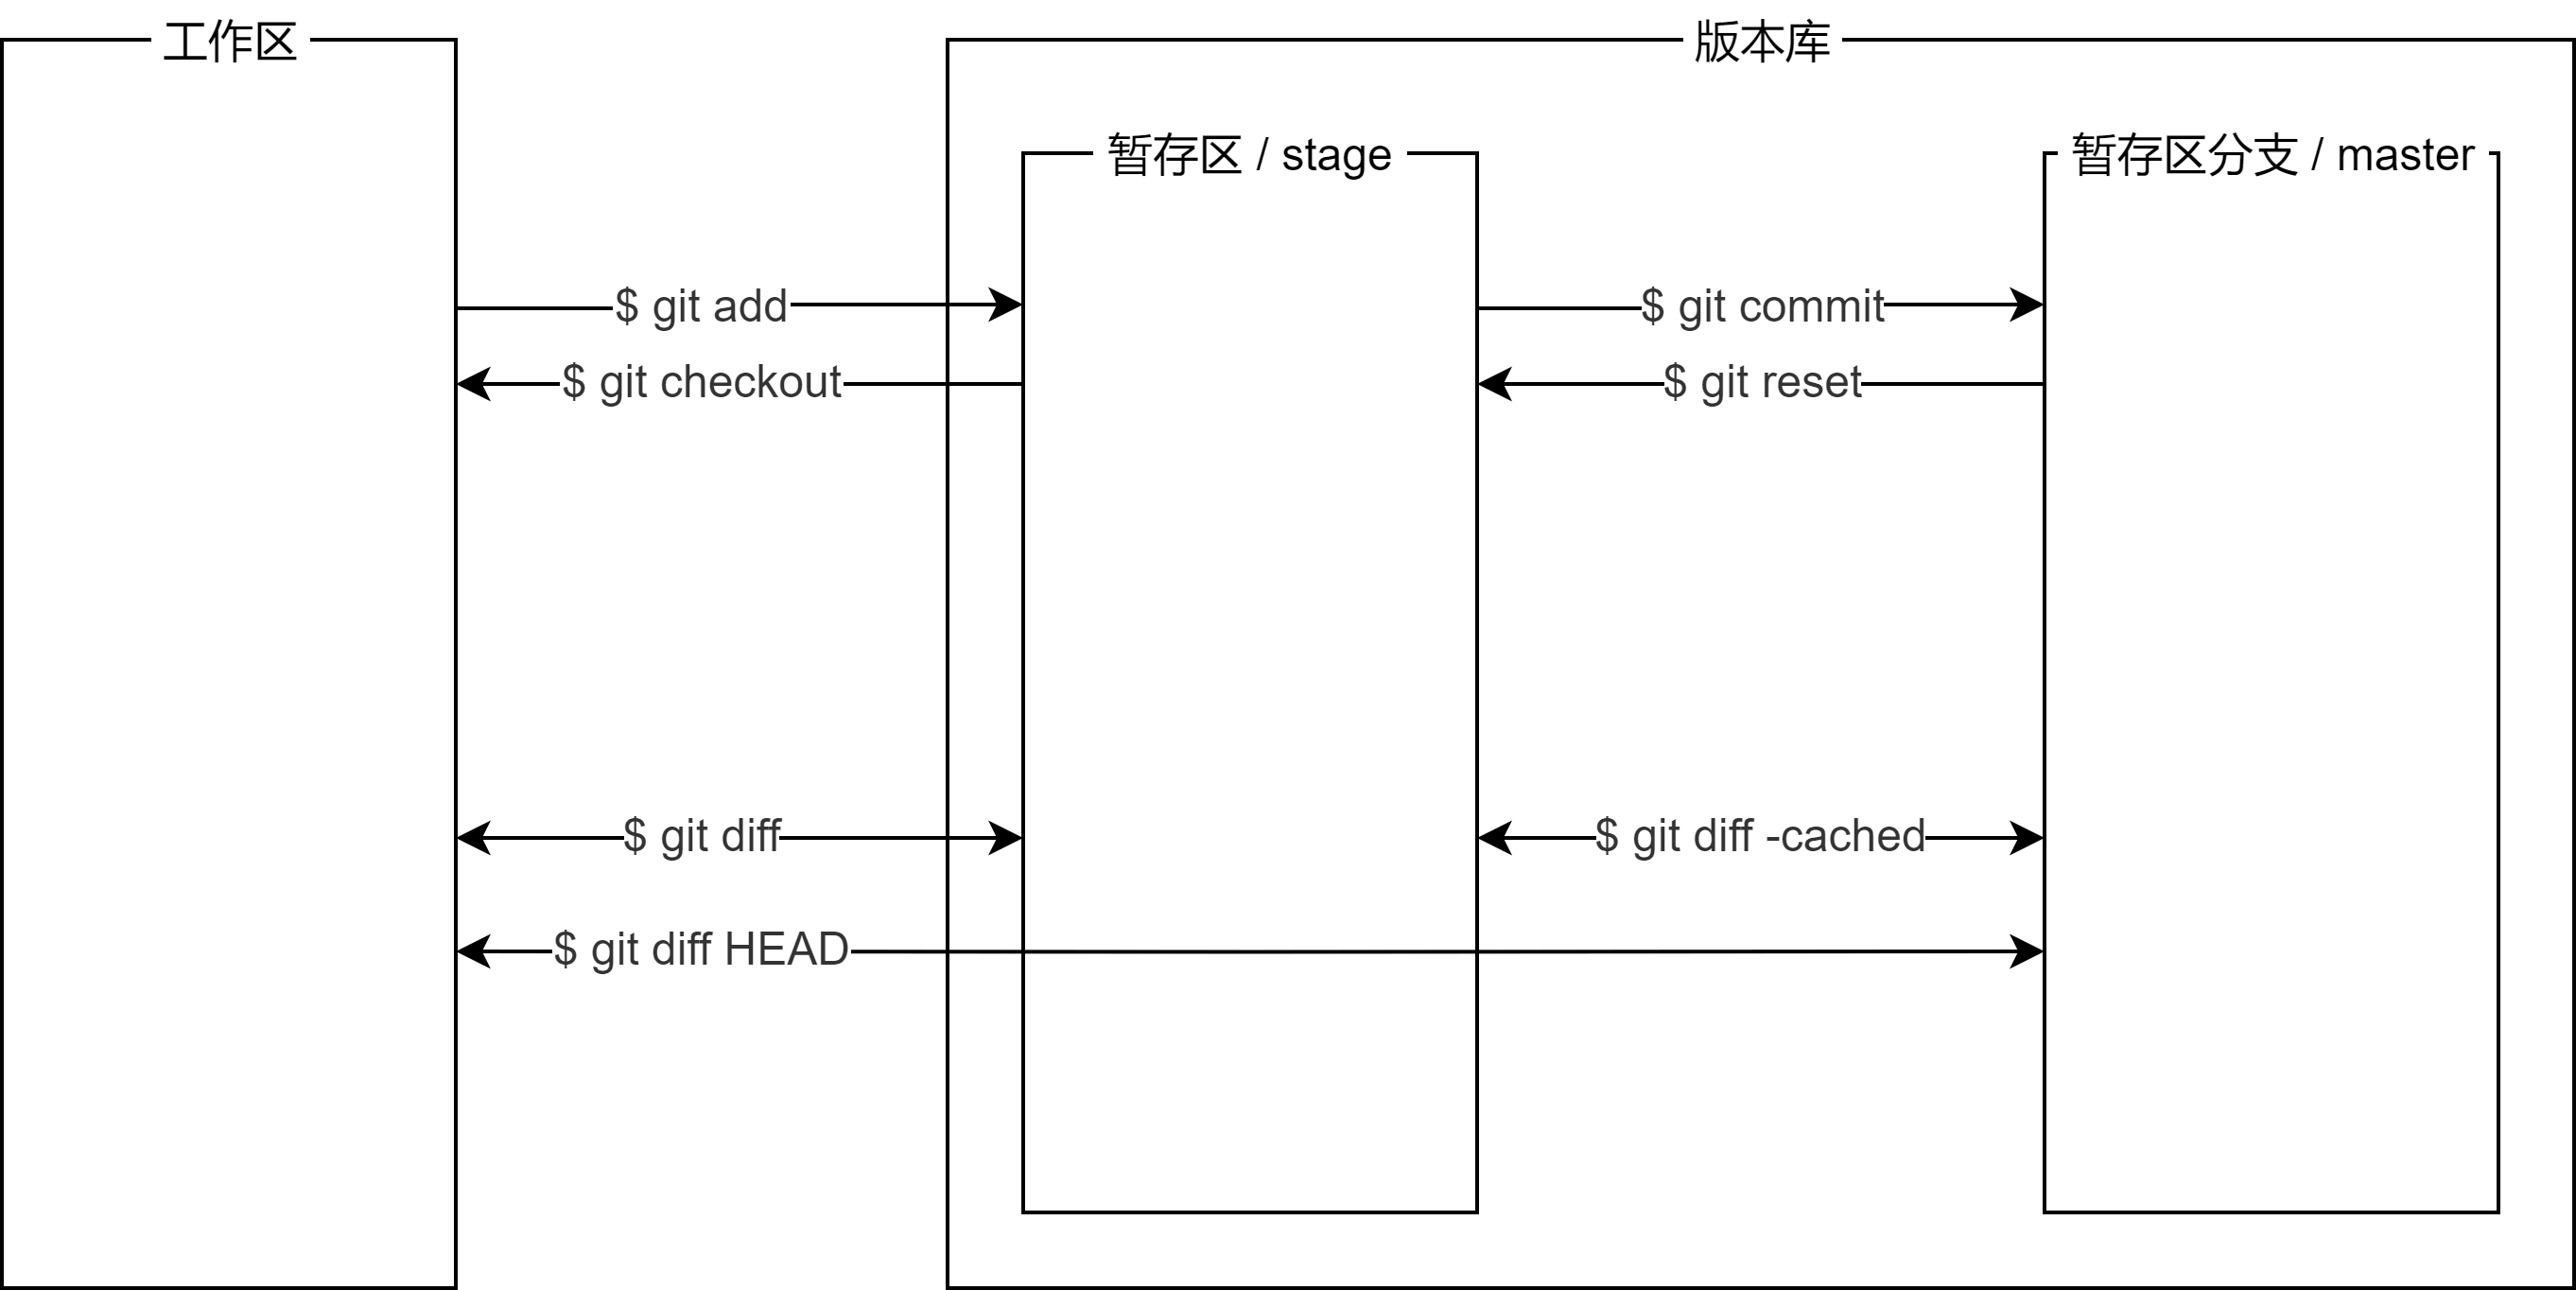
- Ver las modificaciones (solo se puede usar cuando los archivos están en el área de trabajo):
git diff - Ver el estado del repositorio:
git status - Ver el historial de confirmaciones (en orden de confirmación):
git log, presionarqpara salir - Ver el historial de comandos (todos los registros de confirmación):
git reflog
Repositorio Remoto
Localizar un Proyecto Local
Para casos en los que ya tienes archivos de proyecto locales.
- Crear una clave SSH:
ssh-keygen -t rsa -C "tuemail@ejemplo.com"- Sustituye con tu dirección de correo electrónico, simplemente presiona Enter para todas las opciones.
- Abre Configuración personal de GitHub - Claves SSH y GPG y agrega una nueva clave SSH.
- Elige un título y usa el contenido del archivo
id_rsa.pub.
- Elige un título y usa el contenido del archivo
- Crea un nuevo repositorio en GitHub, no selecciones "Inicializar este repositorio con un archivo README".
- Si por error inicializaste el repositorio, primero realiza un pull:
git pull origin master
- Si por error inicializaste el repositorio, primero realiza un pull:
- Copia la dirección SSH (por ejemplo:
git@github.com:linyuxuanlin/git-learning.git) y ejecuta el siguiente comando en el repositorio Git local:git remote add origin git@server-name:usuario/nombre-repo.git - Sube el contenido local al repositorio remoto:
git push -u origin master- Cuando se muestre un mensaje de confirmación, ingresa "yes" y presiona Enter para continuar.
- Dado que el repositorio remoto está vacío, al empujar la rama master local por primera vez con el parámetro "-u", Git asocia la rama local y la rama remota, lo que simplifica los comandos futuros.
- Para futuras confirmaciones:
git push origin master
Localizar un Proyecto Remoto
Para comenzar desde cero o basarse en un proyecto existente.
- Clonar el repositorio remoto:
git clone git@server-name:usuario/nombre-repo.git
Gestión de Ramas
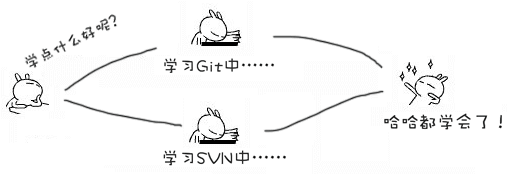
A branch is like a parallel universe in a science fiction movie. While you're diligently studying Git in front of your computer, another "you" is working hard in a parallel universe, learning SVN.
If these two parallel universes don't interfere with each other, they have no impact on your current self. However, at some point in time, these two universes merge, and the result is that you've learned both Git and SVN!
So, what's the practical use of branches? Let's say you're about to develop a new feature, but it will take two weeks to complete. In the first week, you've written 50% of the code. If you were to submit it immediately, the incomplete codebase would prevent others from working. If you wait until all the code is written to submit it, there's a significant risk of losing daily progress.
But now, with branches, you don't have to worry. You create your own branch that others can't see, and they continue to work on the original branch as usual. You work on your own branch and submit changes whenever you want. Once the development is complete, you merge it into the original branch all at once. This way, it's both safe and doesn't affect others' work.
- Create and switch to a new branch:
git switch -c branch_name
-cstands for creating and switching branches.- View the current branch:
git branch- Merge the content of a new branch into the master branch:
git merge branch_name
- First, switch to the branch to be merged, and then use the merge command (e.g., switch to the master branch and execute the above command).
- When Git cannot automatically merge the branches, you must resolve conflicts first. After resolving conflicts, you can submit the changes to complete the merge.
- Resolving conflicts involves manually editing the files that Git failed to merge and making them match your desired content before submitting.
- Delete a branch:
git branch -d dev- Disable fast-forward branch merging:
git merge --no-ff -m "commit text" branch_name
- Because this merge creates a new commit, use the
-mparameter to include a commit message.- In fast-forward mode, if a branch is deleted after merging, it will lose branch information.
GitHub Roaming Guide
With the help of the GitHub platform, we can discover a vibrant world of open-source projects and collaborate with developers from around the globe to build an open-source world.
When we come across an outstanding open-source project, we can start by forking it to our own GitHub account (to gain read and write permissions). Then, we can clone it to our local environment using SSH for development. After completing the development, we can initiate a pull request on GitHub. If the original project owner finds your changes suitable, they will merge them into the existing open-source project.
GitHub CLI
GitHub CLI is a command-line tool for GitHub that brings features like pull requests, issues, and more to the command line. Download link: cli.github.com GitHub CLI is currently in beta and worth trying.
References and Acknowledgments
- Tutorial de Git - Liao Xuefeng
- Cómo utilizar Git en proyectos reales para la gestión de ramas
- Un modelo exitoso de ramificación en Git
- git-cheatsheet.pdf
- Pro Git
- GitHub CLI - Manual
- Más de 20 imágenes de calidad para introducirte en el mundo de Git
Dirección original del artículo: https://wiki-power.com/ Este artículo está protegido por la licencia CC BY-NC-SA 4.0. Si desea reproducirlo, por favor indique la fuente.
Este post está traducido usando ChatGPT, por favor feedback si hay alguna omisión.