Git Learning Notes
Installation and Configuration
Download the installation package: git-scm.com/downloads
Configuration:
Basic Commands
Basic Workflow
- Navigate to the specified directory:
cd git-learning - Initialize a Git repository:
git init - Transfer existing/new files from the working directory to the staging area:
git add .: Add all files from the working directorygit add xxx.xx: Add a single file
- Commit updates to the staging area branch:
git commit -m "description" - Switch to a specific version:
git reset --hard commit_id
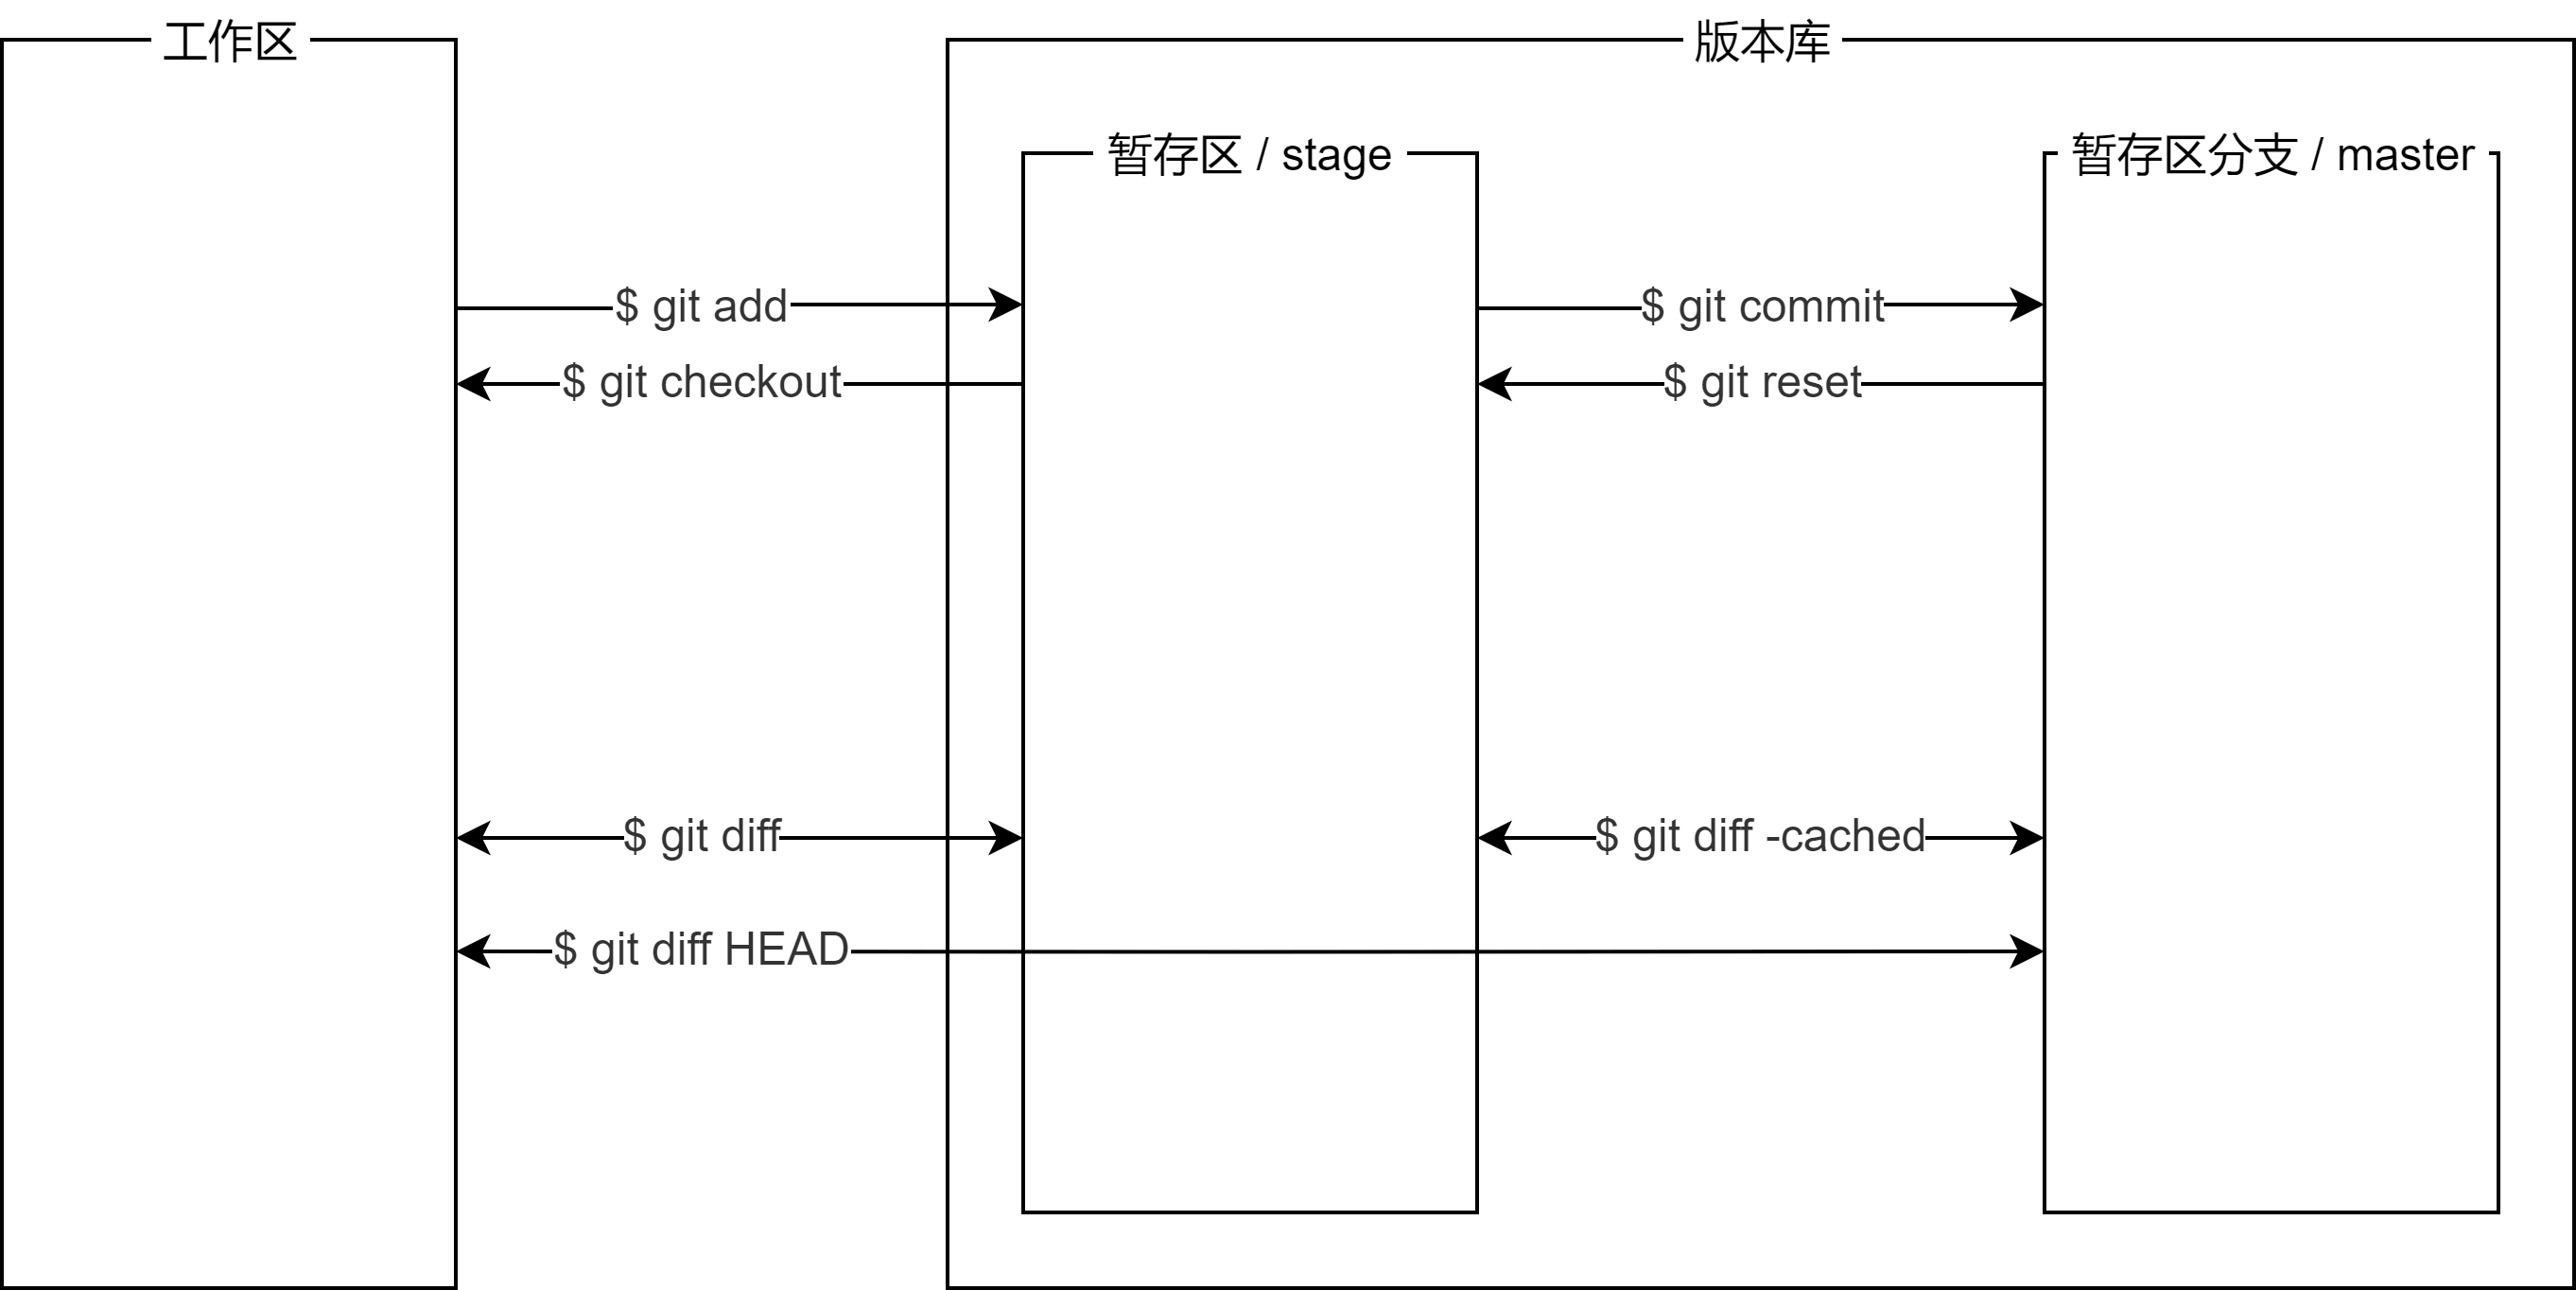
Common Commands
- View modifications (only when files are in the working directory):
git diff - Check repository status:
git status - View commit history (in chronological order):
git log, pressqto exit - View command history (all commit records):
git reflog
Remote Repository
Local Project to Remote
Applicable when you already have local project files.
- Create an SSH Key:
ssh-keygen -t rsa -C "youremail@example.com"- Replace with your email and press Enter for all prompts
- Open GitHub Settings - SSH and GPG keys and add a new SSH key.
- Title can be anything; the key is the content from the
id_rsa.pubfile.
- Title can be anything; the key is the content from the
- Create a new repository on GitHub, do not select "Initialize this repository with a README."
- If you accidentally initialized the repository, first pull it down:
git pull origin master
- If you accidentally initialized the repository, first pull it down:
- Copy the SSH address (e.g.,
git@github.com:linyuxuanlin/git-learning.git), and in your local Git repository, run the command:git remote add origin git@server-name:user/repo-name.git - Push the local content to the remote repository:
git push -u origin master- When prompted, type "yes" and press Enter to continue.
- Since the remote repository is empty, the first time we push the master branch, we use the
-uparameter to establish a connection between the local and remote master branches, simplifying future commands.
- For all subsequent commits:
git push origin master
Localize Remote Project
Applicable when starting from scratch or working on someone else's project.
- Clone the remote repository:
git clone git@server-name:user/repo-name.git
Branch Management

Branches are like parallel universes in a science fiction movie. While you're diligently learning Git in front of your computer, another you in a separate parallel universe is working hard to master SVN. If these two parallel universes don't interfere with each other, it doesn't affect your current self much. However, at some point in time, these two parallel universes merge, and as a result, you've learned both Git and SVN!
So, what's the practical use of branches? Let's say you're about to develop a new feature, but it will take two weeks to complete. During the first week, you've written 50% of the code. If you immediately commit it, the incomplete codebase could hinder others' work. If you wait to submit the code until it's entirely finished, there's a substantial risk of losing daily progress.
Now, with branches, you don't have to worry. You create a branch that belongs to you, invisible to others, and they can continue working on the original branch. You work on your branch and submit your changes whenever you want. When the development is complete, you merge it into the original branch in one go. This way, it's both safe and doesn't disrupt others' work.
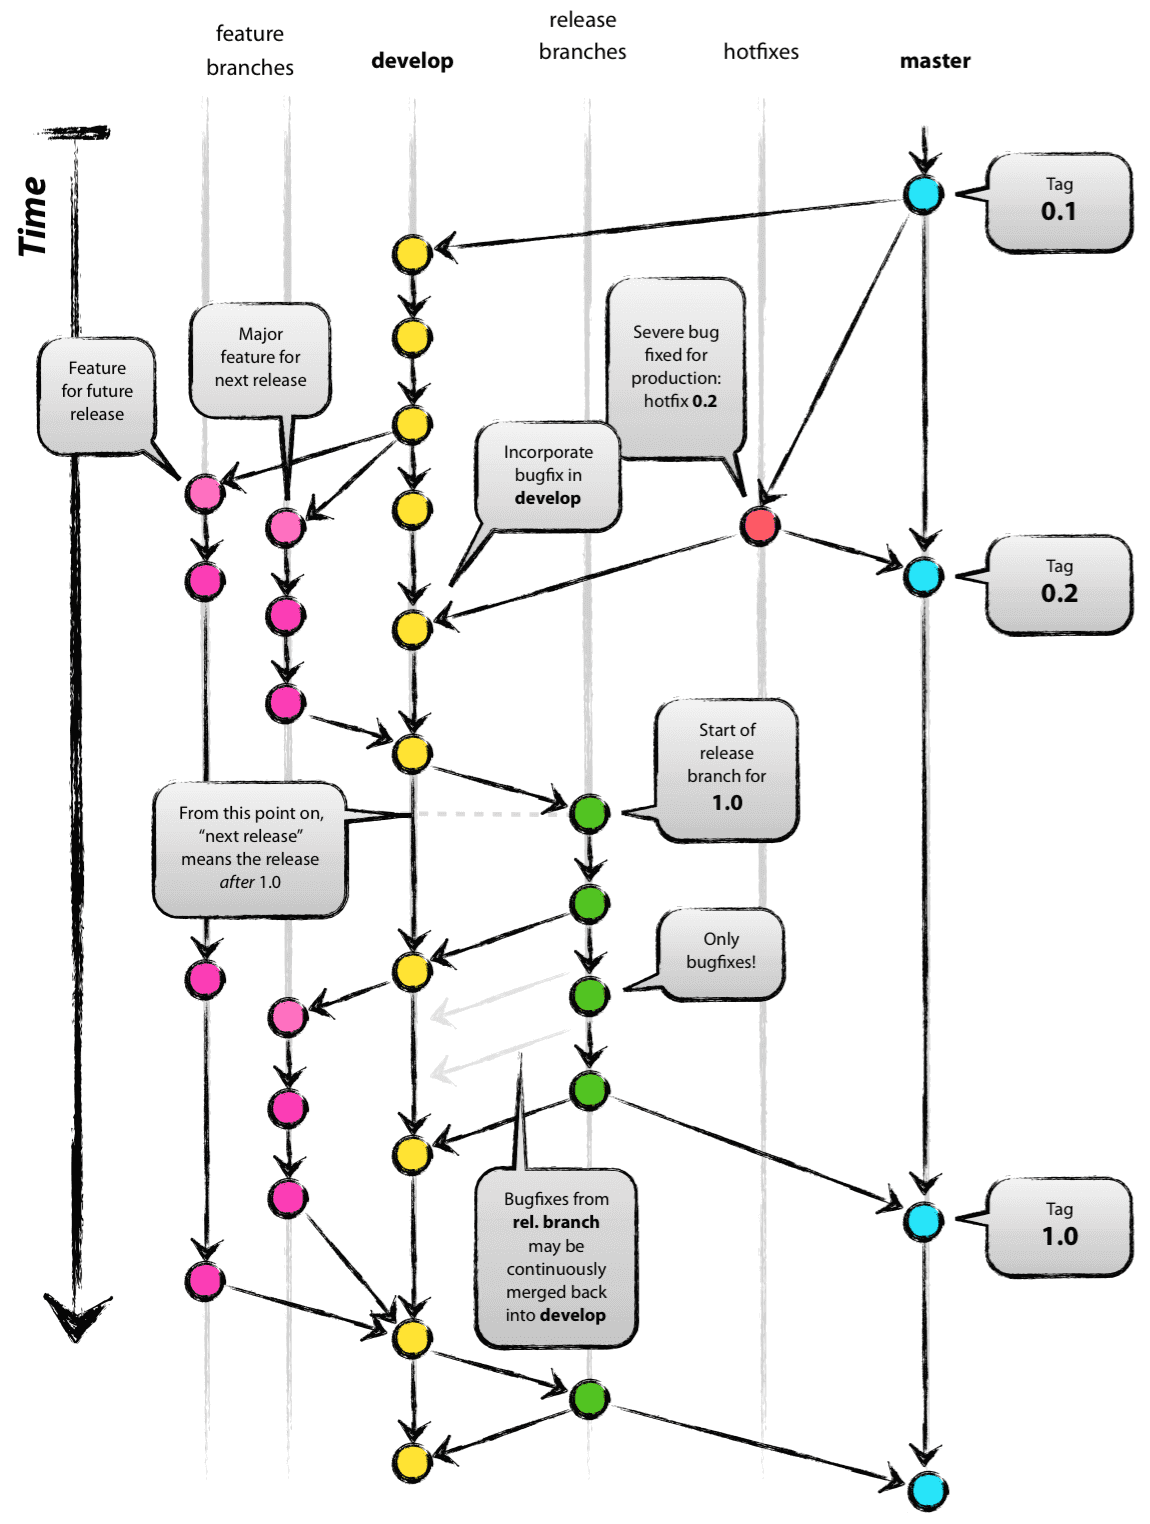
- Create and switch to a new branch:
git switch -c branch_name-cstands for creating and switching branches.
- View the current branch:
git branch - Merge the content of a new branch into the master:
git merge branch_name- First, switch to the branch you want to merge, then use the merge command (e.g., switch to master first and then execute the above command).
- When Git can't automatically merge branches, you need to resolve conflicts first. After resolving conflicts, submit the changes to complete the merge.
- Resolving conflicts involves manually editing the files that Git failed to merge and making them match your desired content before committing.
- Delete a branch:
git branch -d dev - Disable Fast Forward when merging branches:
git merge --no-ff -m "commit text" branch_name- Because this merge will create a new commit, use the
-mparameter to write the commit description. - In Fast Forward mode, branch information is lost when the branch is deleted.
- Because this merge will create a new commit, use the
GitHub Roaming Guide
With the help of the GitHub platform, we can discover a diverse range of open-source projects and collaborate with developers from around the world to build an open-source community. When you find an outstanding open-source project, you can start by forking it to your own GitHub account (so you have read and write permissions). Then, clone it to your local environment using SSH for development. After completing your work, you can initiate a pull request on GitHub. If the original project owner approves your changes, they will be merged into the existing open-source project.
GitHub CLI
GitHub CLI is a command-line tool provided by GitHub that brings the functionality of pull requests, issues, and more to the command line. You can download it from cli.github.com. GitHub CLI is currently in beta, but it's worth a try.
References and Acknowledgments
- Git Tutorial - Liao Xuefeng
- How to Use Git for Branch Management in Real Projects
- A Proven Model for Successful Git Branching
- git-cheatsheet.pdf
- Pro Git
- GitHub CLI - Manual
- More than 20 Beautiful Images to Guide You into the World of Git
[Replace with link 1] [Replace with link 2]
This post is translated using ChatGPT, please feedback if any omissions.