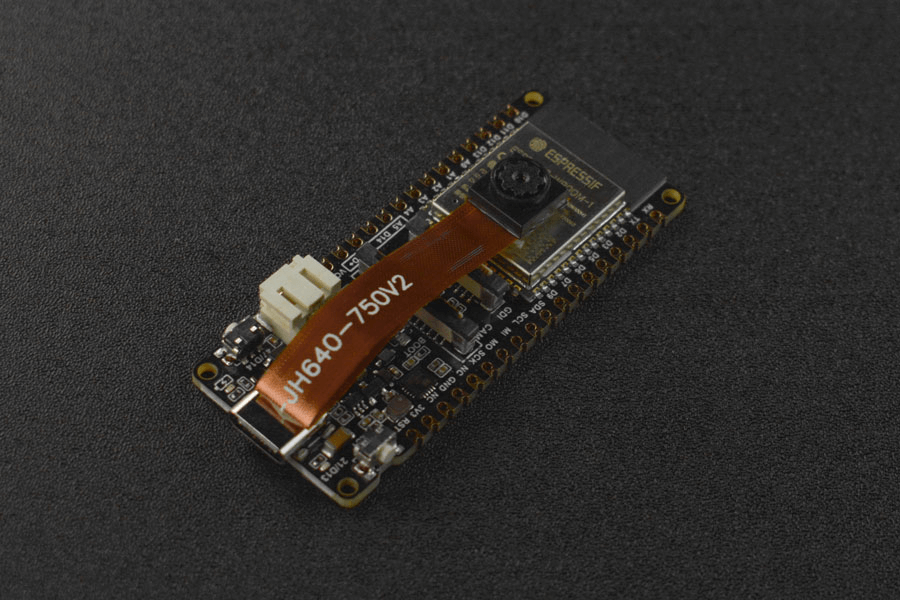
StyleTransferCam - 基于 ESP32-S3 的风格迁移相机
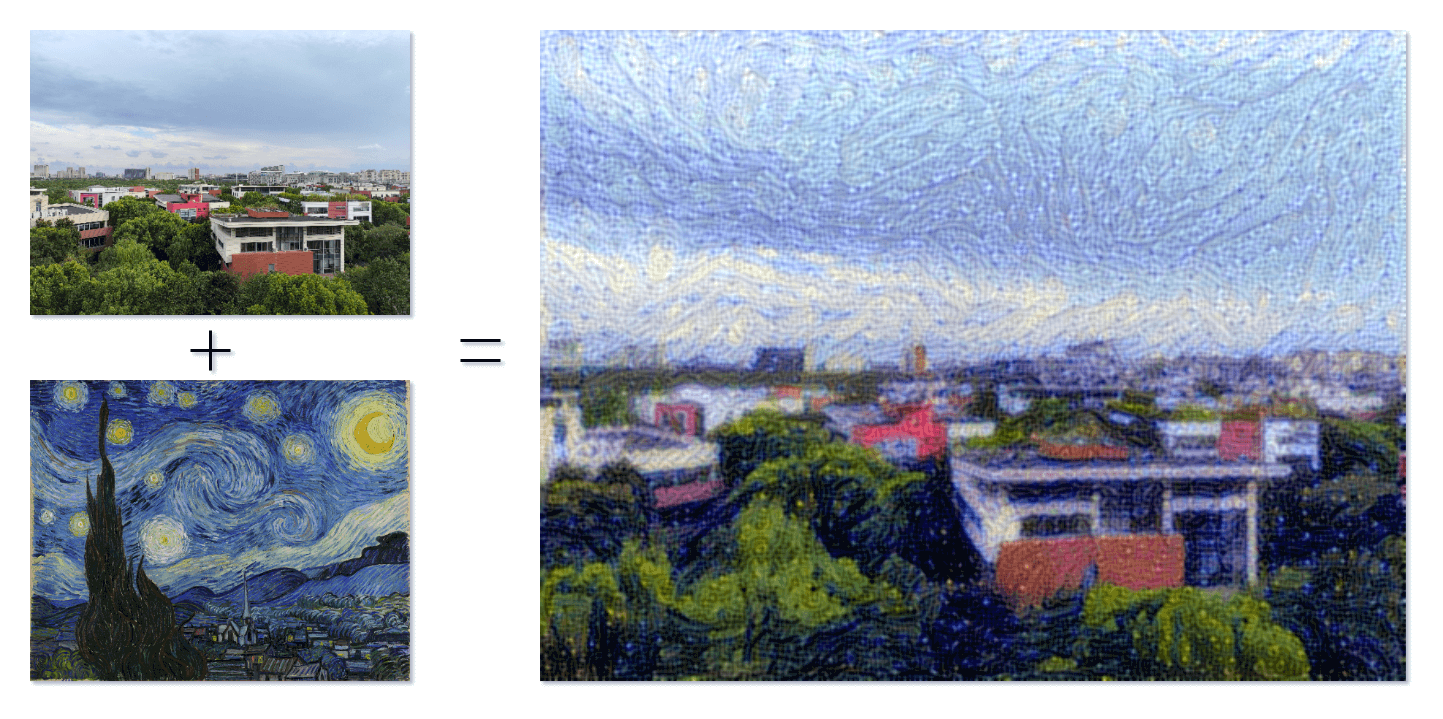
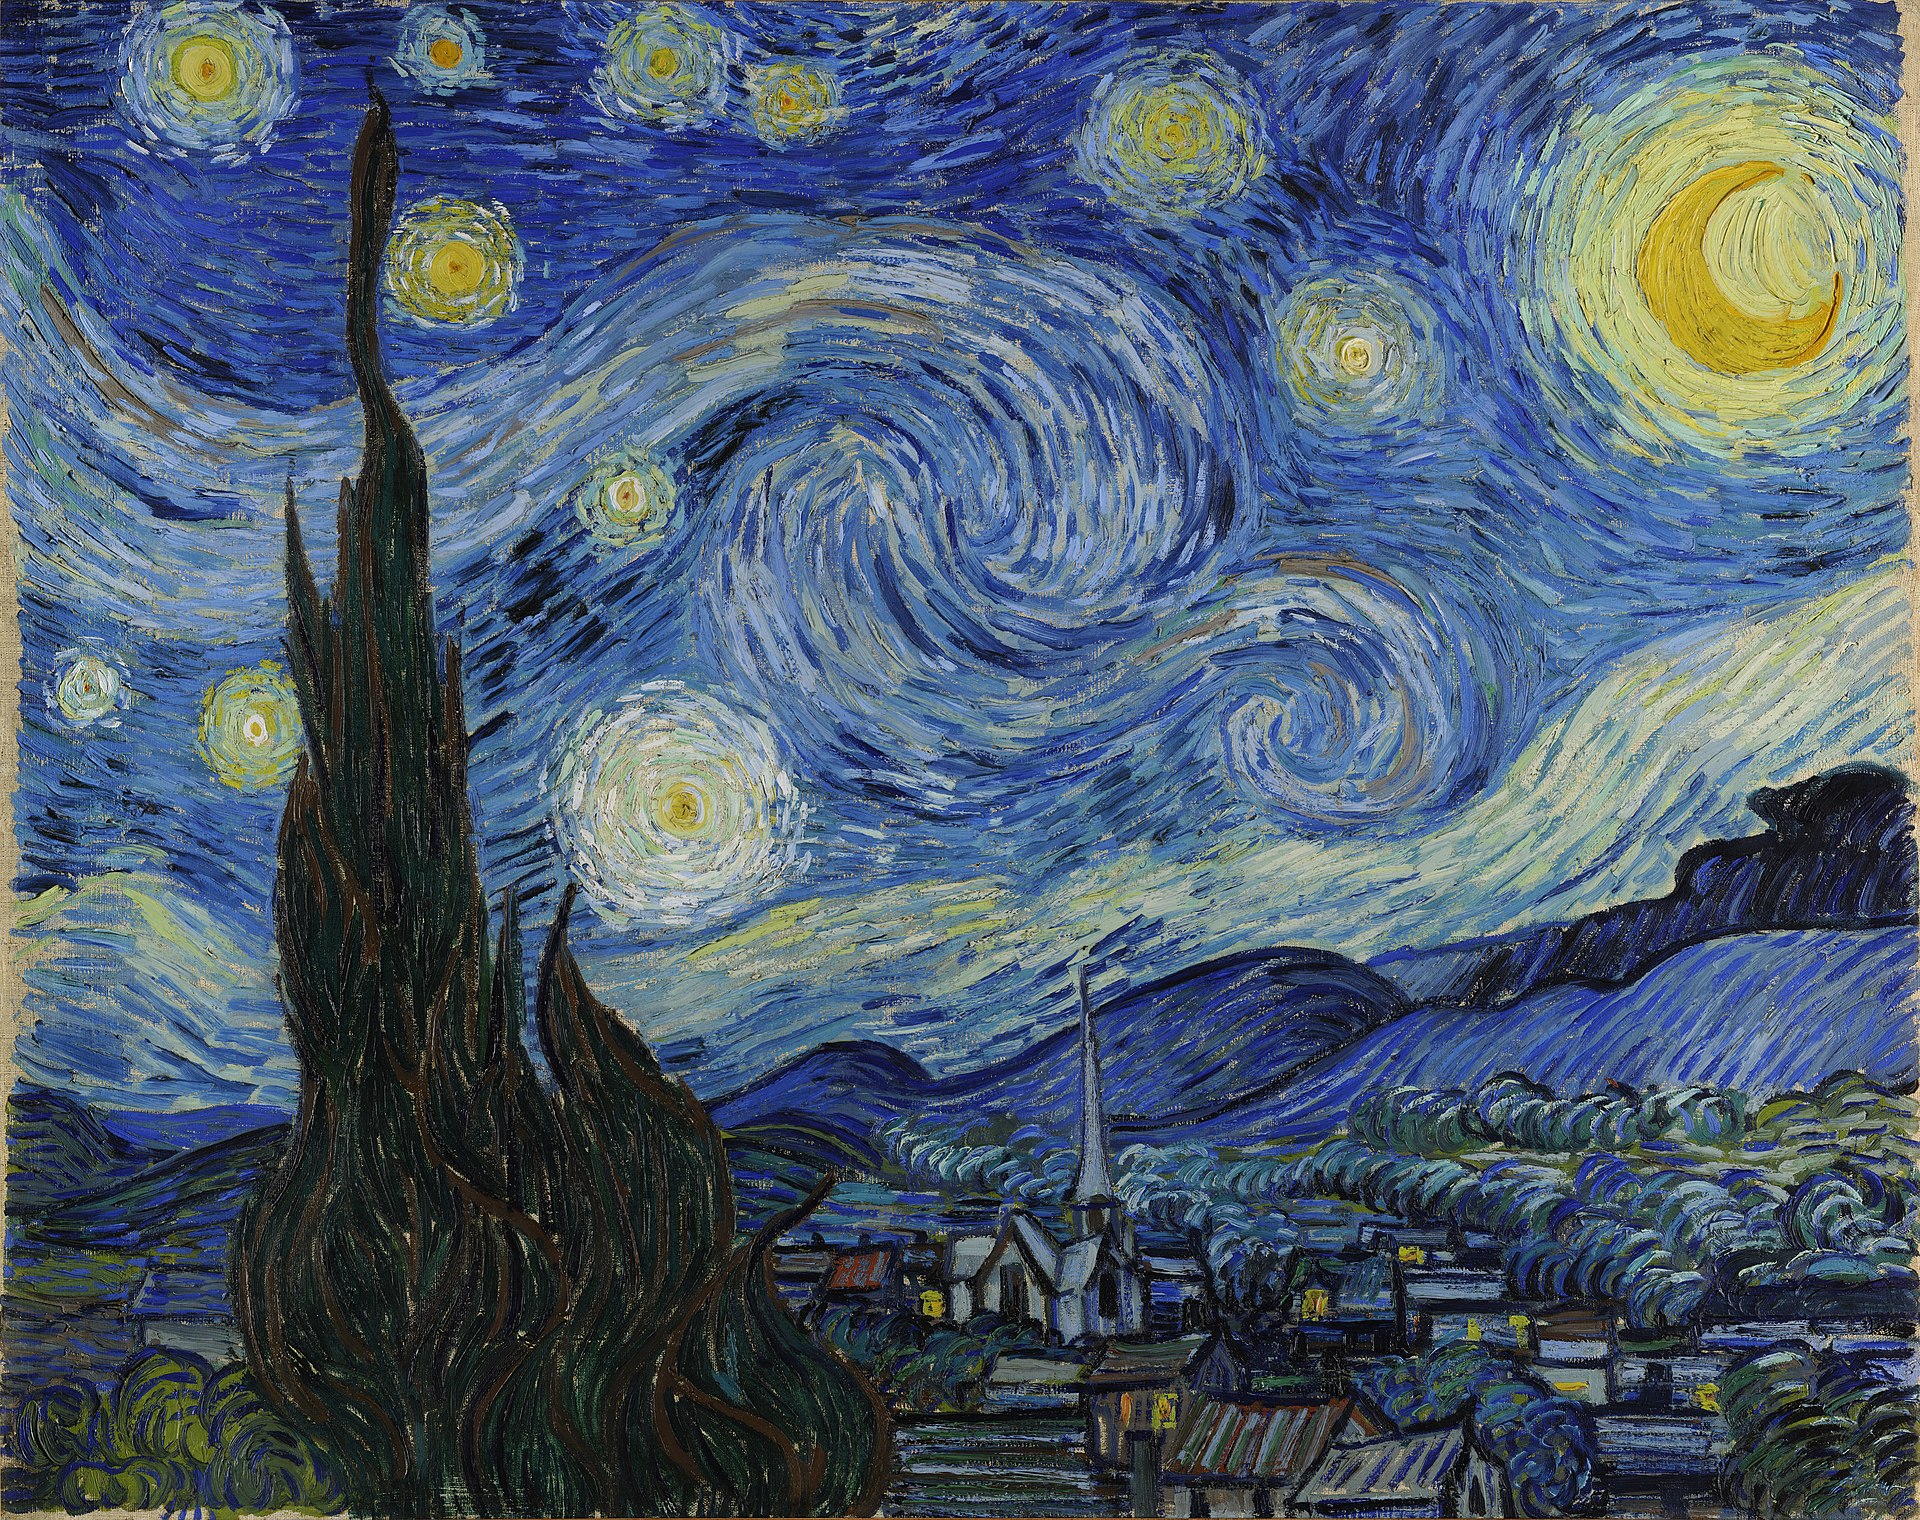
当艺术与技术交汇,一幅新的世界在我们面前展开,这是一场视觉上的奇妙盛宴,也是一份无限可能的探索。StyleTransferCam 是一个基于 ESP32-S3 的风格迁移相机。它使用的是一种叫「风格迁移」的机器学习技术,当你按下板载按钮时,它将拍下当前的景色,并与一张预设的风格模板照片混合(可以是梵高的「星空」),生成一张别具匠心的作品。
StyleTransferCam 大致由以下几个流程组成:
- 按下板载按钮 - 拍摄照片 - 上传到后端服务器上(也可以是 PC 或旧手机)。
- 自动启动风格迁移的 Python 程序,对照片进行处理,并输出风格化的照片。
- 如果 ESP32-S3 有附带 TFT 屏幕的话,也可以回传屏幕显示出来。
测试板载按钮与 LED
首先是一个简单的 Arduino 程序,用于测试板载按钮与 LED 能否正常使用。程序中设置了硬件中断,捕捉按钮按下的事件,点亮 LED 半秒后自动熄灭。
#define ONBOARD_KEY 47  // 板载按钮
#define ONBOARD_LED 21  // 板载 LED

volatile bool buttonPressed = false;  // 按钮下降沿中断标志位

void setup() {
  pinMode(ONBOARD_LED, OUTPUT);
  pinMode(ONBOARD_KEY, INPUT);
  Serial.begin(115200);
  attachInterrupt(digitalPinToInterrupt(ONBOARD_KEY), buttonInterrupt, FALLING);
}

void loop() {
  if (buttonPressed) {
    digitalWrite(ONBOARD_LED, HIGH);
    delay(500);
    digitalWrite(ONBOARD_LED, LOW);
    Serial.println("buttonPressed");
    buttonPressed = false;  // 重置中断标志位
  }
}

void buttonInterrupt() {
  buttonPressed = true;  // 设置下降沿中断标志位
}
使用按钮拍摄照片并上传
接下来,我们编写一个 Arduino 程序,使用板载按钮控制 ESP32-S3 拍摄一张照片,并将其上传到指定的网络位置。这个网络位置在代码中的 serverName = "http://192.168.31.2:9000/upload" 进行设置,需要修改为你后端服务器的地址。我们用的是一个后端 Python 文件上传服务(会在接下来的步骤中说明),而这里需要修改为运行这个服务的机器 IP 地址。(9000 与 /upload 在下文的 receive-photo.py 程序中设置)
#include "esp_camera.h"
#include <WiFi.h>
#include <HTTPClient.h>

// 用于上传照片的服务器地址
const char *serverName = "http://192.168.31.2:9000/upload";

//
// WARNING!!! PSRAM IC required for UXGA resolution and high JPEG quality
//            Ensure ESP32 Wrover Module or other board with PSRAM is selected
//            Partial images will be transmitted if image exceeds buffer size
//
//            You must select partition scheme from the board menu that has at least 3MB APP space.
//            Face Recognition is DISABLED for ESP32 and ESP32-S2, because it takes up from 15
//            seconds to process single frame. Face Detection is ENABLED if PSRAM is enabled as well

// ===================
// Select camera model
// ===================
#define PWDN_GPIO_NUM -1
#define RESET_GPIO_NUM -1
#define XCLK_GPIO_NUM 45
#define SIOD_GPIO_NUM 1
#define SIOC_GPIO_NUM 2

#define Y9_GPIO_NUM 48
#define Y8_GPIO_NUM 46
#define Y7_GPIO_NUM 8
#define Y6_GPIO_NUM 7
#define Y5_GPIO_NUM 4
#define Y4_GPIO_NUM 41
#define Y3_GPIO_NUM 40
#define Y2_GPIO_NUM 39
#define VSYNC_GPIO_NUM 6
#define HREF_GPIO_NUM 42
#define PCLK_GPIO_NUM 5

#define ONBOARD_KEY 47 // 板载按钮
#define ONBOARD_LED 21 // 板载 LED

volatile bool buttonPressed = false; // 按钮下降沿中断标志位

#include "DFRobot_AXP313A.h"

DFRobot_AXP313A axp;

// ===========================
// Enter your WiFi credentials
// ===========================
const char *ssid = "WiFi_SSID";
const char *password = "********";

void startCameraServer();

void setup()
{
  pinMode(ONBOARD_KEY, INPUT);
  pinMode(ONBOARD_LED, OUTPUT);
  attachInterrupt(digitalPinToInterrupt(ONBOARD_KEY), buttonInterrupt, FALLING);
  Serial.begin(115200);
  Serial.setDebugOutput(true);
  Serial.println();
  while (axp.begin() != 0)
  {
    Serial.println("init error");
    delay(1000);
  }
  axp.enableCameraPower(axp.eOV2640); // 设置摄像头供电
  camera_config_t config;
  config.ledc_channel = LEDC_CHANNEL_0;
  config.ledc_timer = LEDC_TIMER_0;
  config.pin_d0 = Y2_GPIO_NUM;
  config.pin_d1 = Y3_GPIO_NUM;
  config.pin_d2 = Y4_GPIO_NUM;
  config.pin_d3 = Y5_GPIO_NUM;
  config.pin_d4 = Y6_GPIO_NUM;
  config.pin_d5 = Y7_GPIO_NUM;
  config.pin_d6 = Y8_GPIO_NUM;
  config.pin_d7 = Y9_GPIO_NUM;
  config.pin_xclk = XCLK_GPIO_NUM;
  config.pin_pclk = PCLK_GPIO_NUM;
  config.pin_vsync = VSYNC_GPIO_NUM;
  config.pin_href = HREF_GPIO_NUM;
  config.pin_sscb_sda = SIOD_GPIO_NUM;
  config.pin_sscb_scl = SIOC_GPIO_NUM;
  config.pin_pwdn = PWDN_GPIO_NUM;
  config.pin_reset = RESET_GPIO_NUM;
  config.xclk_freq_hz = 20000000;
  config.frame_size = FRAMESIZE_UXGA;   // 照片分辨率。这里默认为 FRAMESIZE_UXGA
  config.pixel_format = PIXFORMAT_JPEG; // for streaming
  // config.pixel_format = PIXFORMAT_RGB565; // for face detection/recognition
  config.grab_mode = CAMERA_GRAB_WHEN_EMPTY;
  config.fb_location = CAMERA_FB_IN_PSRAM;
  config.jpeg_quality = 0; // 63; // 照片质量。这里默认为 12
  config.fb_count = 1;

  /*
  FRAMESIZE_QVGA (320 x 240)
  FRAMESIZE_CIF (352 x 288)
  FRAMESIZE_VGA (640 x 480)
  FRAMESIZE_SVGA (800 x 600)
  FRAMESIZE_XGA (1024 x 768)
  FRAMESIZE_SXGA (1280 x 1024)
  FRAMESIZE_UXGA (1600 x 1200)
  */

  // if PSRAM IC present, init with UXGA resolution and higher JPEG quality
  //                      for larger pre-allocated frame buffer.
  if (config.pixel_format == PIXFORMAT_JPEG)
  {
    if (psramFound())
    {
      config.jpeg_quality = 0; // 63; // 照片质量。这里默认为 10
      config.fb_count = 2;
      config.grab_mode = CAMERA_GRAB_LATEST;
    }
    else
    {
      // Limit the frame size when PSRAM is not available
      config.frame_size = FRAMESIZE_UXGA; // 照片分辨率。这里默认为 FRAMESIZE_SVGA
      config.fb_location = CAMERA_FB_IN_DRAM;
    }
  }
  else
  {
    // Best option for face detection/recognition
    config.frame_size = FRAMESIZE_UXGA; // FRAMESIZE_240X240;
#if CONFIG_IDF_TARGET_ESP32S3
    config.fb_count = 2;
#endif
  }

#if defined(CAMERA_MODEL_ESP_EYE)
  pinMode(13, INPUT_PULLUP);
  pinMode(14, INPUT_PULLUP);
#endif

  // camera init
  esp_err_t err = esp_camera_init(&config);
  if (err != ESP_OK)
  {
    Serial.printf("Camera init failed with error 0x%x", err);
    return;
  }

  sensor_t *s = esp_camera_sensor_get();
  // initial sensors are flipped vertically and colors are a bit saturated
  if (s->id.PID == OV3660_PID)
  {
    s->set_vflip(s, 1);       // flip it back
    s->set_brightness(s, 1);  // up the brightness just a bit
    s->set_saturation(s, -2); // lower the saturation
  }
  // drop down frame size for higher initial frame rate
  if (config.pixel_format == PIXFORMAT_JPEG)
  {
    s->set_framesize(s, FRAMESIZE_QVGA);
  }

#if defined(CAMERA_MODEL_M5STACK_WIDE) || defined(CAMERA_MODEL_M5STACK_ESP32CAM)
  s->set_vflip(s, 1);
  s->set_hmirror(s, 1);
#endif

#if defined(CAMERA_MODEL_ESP32S3_EYE)
  s->set_vflip(s, 1);
#endif

  WiFi.begin(ssid, password);
  WiFi.setSleep(false);

  while (WiFi.status() != WL_CONNECTED)
  {
    delay(500);
    Serial.print(".");
  }
  Serial.println("");
  Serial.println("WiFi connected");

  startCameraServer();

  Serial.print("Camera Ready! Use 'http://");
  Serial.print(WiFi.localIP());
  Serial.println("' to connect");
  digitalWrite(ONBOARD_LED, LOW);
}

void loop()
{
  // Do nothing. Everything is done in another task by the web server
  // delay(10000);

  // 按钮按下后的逻辑
  if (buttonPressed)
  {
    digitalWrite(ONBOARD_LED, HIGH);
    delay(300);
    digitalWrite(ONBOARD_LED, LOW);

    // 拍摄照片
    camera_fb_t *fb = esp_camera_fb_get();
    if (!fb)
    {
      Serial.println("获取摄像头帧缓冲失败");
      return;
    }

    // 建立HTTP客户端
    HTTPClient http;

    // 将照片上传到服务器
    http.begin(serverName);
    http.addHeader("Content-Type", "image/jpeg");
    int httpResponseCode = http.POST(fb->buf, fb->len);
    if (httpResponseCode > 0)
    {
      Serial.printf("照片上传成功,服务器返回代码:%d\n", httpResponseCode);

      // 再闪一下提示上传成功
      digitalWrite(ONBOARD_LED, HIGH);
      delay(300);
      digitalWrite(ONBOARD_LED, LOW);
    }
    else
    {
      Serial.printf("照片上传失败,错误代码:%s\n", http.errorToString(httpResponseCode).c_str());
    }
    http.end();

    // 释放帧缓冲
    esp_camera_fb_return(fb);

    // delay(1000); // 等待 1 秒后才可再次拍摄和上传

    buttonPressed = false; // 重置中断标志位
  }
}

void buttonInterrupt()
{
  buttonPressed = true; // 设置下降沿中断标志位
}
接收照片上传的服务
在这里我们使用 Python 的 flask 库搭建一个接收照片上传的 HTTP 服务器。
from flask import Flask, request
import subprocess

app = Flask(__name__)

@app.route('/upload', methods=['POST'])
def upload():
    try:
        image = request.data

        # 保存照片到指定目录
        with open('base.png', 'wb') as f:
            f.write(image)
        print("照片已保存,正在渲染中……")
        # 启动风格迁移的 python 脚本
        subprocess.run(['python', './style_transfer.py'])

        return "照片上传成功", 200
    except Exception as e:
        print("照片上传失败:", str(e))
        return "照片上传失败", 500

if __name__ == '__main__':
    app.run(host='0.0.0.0', port=9000)
先不要急着运行程序,style_transfer.py 是风格迁移的程序,将会在下一个步骤展示。这个程序的逻辑是,如果成功接收了 ESP32-S3 传回来的照片,就会使用 subprocess 自动调起运行风格迁移的脚本。
需要注意的是,如果程序出现异常,提示端口被占用,你可以试试将 port=9000 换一个值。
风格迁移的程序
在 receive-photo.py 相同的目录下,我们使用 TensorFlow 编写一个风格迁移的 Python 程序。首先安装程序所需的依赖(国内的网络环境导致 TensorFlow 很难下载,需要多一些耐心),然后在相同目录下准备一张待风格化的照片,将其命名为 base.png;还有一张风格参考的图片,命名为 style_reference.png,这副图片可以是一副艺术画,比如梵高的「星空」:
接下来,编写风格迁移的程序:
from IPython.display import Image, display
import numpy as np
import tensorflow as tf
from tensorflow import keras
from tensorflow.keras.applications import vgg19
base_image_path = "./base.png" # 待风格迁移的图片地址
style_reference_image_path = "./style_reference.png" # 风格样式图片地址
result_prefix = "img_generated"
# 各部分损失的权重设置
total_variation_weight = 1e-6
style_weight = 1e-6
content_weight = 2.5e-8
# 生成图片的尺寸
width, height = keras.preprocessing.image.load_img(base_image_path).size
img_nrows = 400
img_ncols = int(width * img_nrows / height)
# 通过下面命令查看要进行风格迁移的基本图片和样式参考图片
display(Image(base_image_path))
display(Image(style_reference_image_path))
# 图像预处理
def preprocess_image(image_path):
# 利用Keras库函数的来打开图片,调整图片大小并将其格式化为适当的张量
img = keras.preprocessing.image.load_img(
image_path, target_size=(img_nrows, img_ncols)
)
img = keras.preprocessing.image.img_to_array(img)
img = np.expand_dims(img, axis=0)
img = vgg19.preprocess_input(img)
return tf.convert_to_tensor(img)
def deprocess_image(x):
# 再利用函数将张量转换为有效图像
x = x.reshape((img_nrows, img_ncols, 3))
# 通过平均像素去除零中心
x[:, :, 0] += 103.939
x[:, :, 1] += 116.779
x[:, :, 2] += 123.68
# 'BGR'->'RGB'
x = x[:, :, ::-1]
x = np.clip(x, 0, 255).astype("uint8")
return x
# 图像张量的gram矩阵(特征矩阵和特征矩阵转置的乘积)
def gram_matrix(x):
x = tf.transpose(x, (2, 0, 1))
features = tf.reshape(x, (tf.shape(x)[0], -1))
gram = tf.matmul(features, tf.transpose(features))
return gram
# “风格损失”旨在保持生成图像中参考图像的样式。
# 它基于的gram矩阵(样式提取)来自样式参考图像
# 和从它生成的图像的特征图
def style_loss(style, combination):
S = gram_matrix(style)
C = gram_matrix(combination)
channels = 3
size = img_nrows * img_ncols
return tf.reduce_sum(tf.square(S - C)) / (4.0 * (channels ** 2) * (size ** 2))
# 辅助损失函数设计来是为了
# 维护生成的图像中的基本图像的内容
def content_loss(base, combination):
return tf.reduce_sum(tf.square(combination - base))
# 第三个损失函数是总变化损失,
# 设计此函数是为了使生成的图像保持局部连贯。
def total_variation_loss(x):
a = tf.square(
x[:, : img_nrows - 1, : img_ncols - 1, :] - x[:, 1:, : img_ncols - 1, :]
)
b = tf.square(
x[:, : img_nrows - 1, : img_ncols - 1, :] - x[:, : img_nrows - 1, 1:, :]
)
return tf.reduce_sum(tf.pow(a + b, 1.25))
# 接下来,让我们创建一个特征提取模型,该模型检索VGG19的中间激活(根据名字制成字典)。
# 替换为你本地下载的权重文件路径
weights_path = "./dependencies/vgg19_weights_tf_dim_ordering_tf_kernels_notop.h5"
# 建立一个加载了已经训练好的ImageNet的权重的VGG19模型
model = vgg19.VGG19(weights=weights_path, include_top=False)
# 获取每个“关键”层的符号输出(我们给它们指定了唯一的名称)。
outputs_dict = dict([(layer.name, layer.output) for layer in model.layers])
# 建立一个模型,以返回VGG19中每层的激活值(以字典的方式)。
feature_extractor = keras.Model(inputs=model.inputs, outputs=outputs_dict)
# 最后,这是计算样式转移损失的代码。
# 用于样式丢失的图层列表。
style_layer_names = [
"block1_conv1",
"block2_conv1",
"block3_conv1",
"block4_conv1",
"block5_conv1",
]
# 用于内容丢失的层。
content_layer_name = "block5_conv2"
def compute_loss(combination_image, base_image, style_reference_image):
input_tensor = tf.concat(
[base_image, style_reference_image, combination_image], axis=0
)
features = feature_extractor(input_tensor)
# 初始化损失
loss = tf.zeros(shape=())
# 加入内容丢失
layer_features = features[content_layer_name]
base_image_features = layer_features[0, :, :, :]
combination_features = layer_features[2, :, :, :]
loss = loss + content_weight * content_loss(
base_image_features, combination_features
)
# 加入风格损失
for layer_name in style_layer_names:
layer_features = features[layer_name]
style_reference_features = layer_features[1, :, :, :]
combination_features = layer_features[2, :, :, :]
sl = style_loss(style_reference_features, combination_features)
loss += (style_weight / len(style_layer_names)) * sl
# 加入总变化损失
loss += total_variation_weight * total_variation_loss(combination_image)
return loss
# 将tf.function装饰器添加到损耗计算和梯度计算中,使在编译过程中能运行更快
@tf.function
def compute_loss_and_grads(combination_image, base_image, style_reference_image):
with tf.GradientTape() as tape:
loss = compute_loss(combination_image, base_image,
style_reference_image)
grads = tape.gradient(loss, combination_image)
return loss, grads
# 重复执行批量梯度下降步骤,以最大程度地减少损失,并每100次迭代保存生成的图像。
# 每100步将学习率降低0.96。
optimizer = keras.optimizers.SGD(
keras.optimizers.schedules.ExponentialDecay(
initial_learning_rate=100.0, decay_steps=100, decay_rate=0.96
)
)
base_image = preprocess_image(base_image_path)
style_reference_image = preprocess_image(style_reference_image_path)
combination_image = tf.Variable(preprocess_image(base_image_path))
iterations = 4000
for i in range(1, iterations + 1):
loss, grads = compute_loss_and_grads(
combination_image, base_image, style_reference_image
)
optimizer.apply_gradients([(grads, combination_image)])
if i % 100 == 0:
print("Iteration %d: loss=%.2f" % (i, loss))
img = deprocess_image(combination_image.numpy())
fname = result_prefix + "_at_iteration_%d.png" % i
keras.preprocessing.image.save_img(fname, img)
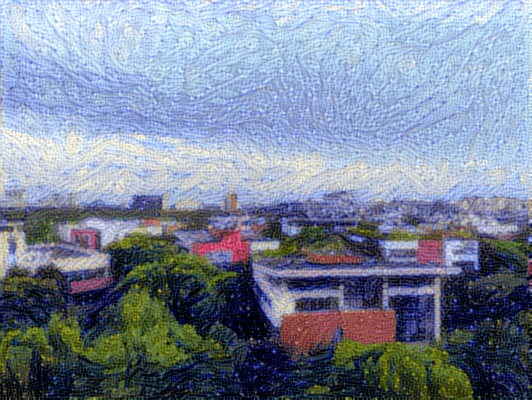
# 经过 4000 次迭代,输出结果:
display(Image(result_prefix + "_at_iteration_4000.png"))
现在,你可以试试单独运行这个 Python 程序,如果程序没有报错,等上一小会儿(具体时间取决于你电脑的性能),你就可以在当前目录下找到阶梯次风格迁移迭代后的照片了。
如果这个程序能正常运行,你可以直接运行 receive-photo.py,使用自动化的方式接收来自 ESP32-S3 拍摄的照片,直接生成风格化的照片。
参考与致谢
原文地址:https://wiki-power.com/
本篇文章受 CC BY-NC-SA 4.0 协议保护,转载请注明出处。